
On this page
- Why a favorite toy makes a great custom coloring page
- How to photograph a toy for a coloring page
- Which toys turn into the clearest coloring pages
- Choosing the detail level for a toy coloring page
- Make the toy coloring page in Outlineify
- Printing and coloring the toy page
- Ideas for toy coloring pages at home
- A note on logos and characters
- Toy coloring page questions
Short answer: Put the favorite toy on a plain floor or table in daylight, take a photo at the toy’s height so it fills the frame, and turn the photo into a color-by-number page with Outlineify. The page keeps the toy’s shape and its colors in the color key, with a colored example to follow.
Every home has one: the toy car that goes everywhere, the teddy bear with the worn ear, the doll that sits at the table during dinner. A coloring page of that favorite toy is a page your child already loves before the first crayon touches it. This guide shows how to photograph a toy so it turns into a clear coloring page, which toys work best, and what to do with the page once it is colored.
Why a favorite toy makes a great custom coloring page
A coloring page of a favorite toy is personal in a way a store-bought page cannot be. The toy is familiar, it has a name and often a story, and its colors are well known at home: the red of the car, the brown of the bear, the blue of the dress.
Toys are also good subjects for clear coloring pages. Most of them have strong outlines, a few big parts and solid colors, which turn into clean, well-defined numbered areas. And unlike pets, toys sit still for the photo.
How to photograph a toy for a coloring page
You only need a phone and a few minutes. These steps give the cleanest results:
- Choose a plain background. A wooden floor, a light tabletop or a plain wall works well. Move other toys out of the picture.
- Use daylight. Place the toy near a window. Avoid harsh lamps that cast strong shadows; shadows can turn into extra areas.
- Get down to the toy’s height. Photograph a toy car from the side at floor level, or a teddy bear from the front at its eye level.
- Fill the frame. The toy should take up most of the photo. You can crop later in the app, but starting close helps.
- Show the toy’s best side. The side with the face, the logo or the favorite detail.
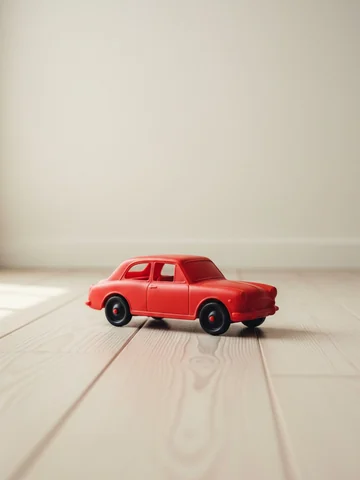 The photo
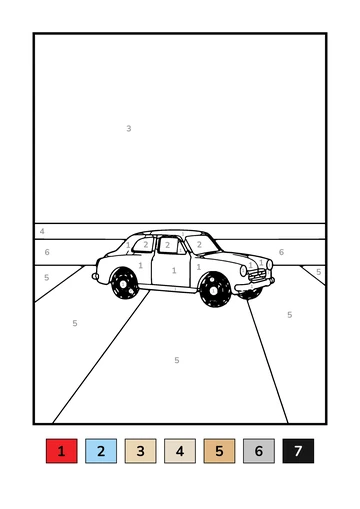 The page to print
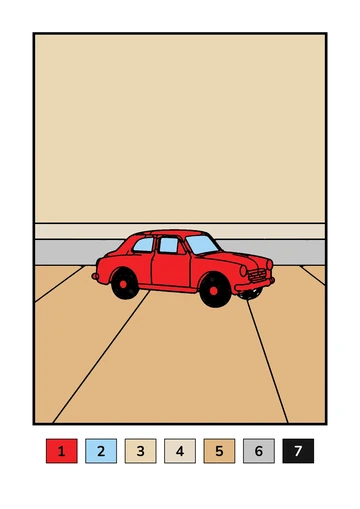 The colored example
Which toys turn into the clearest coloring pages
Some toys turn into pages more easily than others:
- Toy cars, trains and trucks have clear outlines and bold colors, with wheels and windows that become satisfying areas to color.
- Teddy bears and soft toys have round, simple shapes, which work well even at the simple detail level.
- Wooden blocks and stacking toys give big, geometric shapes in a few strong colors.
- Dolls and action figures work best from the front, close up, with the face and outfit filling the frame.
Toys with many small parts, very shiny surfaces or detailed printed patterns give pages with more, smaller areas. Shiny plastic can also reflect a window as a bright spot that becomes an area of its own. Turning the toy slightly away from the light helps.
Choosing the detail level for a toy coloring page
Outlineify makes pages at two detail levels, and you choose for each photo:
- 0–2: Big, simple shapes. Fewer areas and thick lines that are easy to stay inside. A toy car becomes a body, windows and wheels, with only a few colors in the key.
- 2+: More to color. More areas and numbers, with more of the toy’s details kept in, such as headlights, stitching or the pattern on a dress.
You can make both from the same photo, so siblings or a grandparent can color the same toy at different levels. Our guide to color-by-number pages for toddlers and young children explains the difference in more detail.
Make the toy coloring page in Outlineify
- Open Outlineify on your iPhone or iPad and take a new photo of the toy, or choose one from your library.
- Drag the corners of the frame around the toy. Cropping closer gives bigger shapes and clearer lines.
- Choose 0–2 or 2+.
- Wait about a minute while Outlineify draws the outlines, numbers every area and builds a color key from the colors in your photo. A notification tells you when the page is ready.
- Print it, save a PDF or an image, or share it.
For a closer look at each step, read our guide on how to turn a photo into a coloring page.
Printing and coloring the toy page
Every page fits A4 and US Letter. When you print, you can add the colored example on a second sheet, so the right colors are always at hand. Toy pages with big shapes are great for crayons; detailed pages with small parts are easier with colored pencils. Our comparison of crayons, markers and colored pencils helps you choose.
A fun way to start: put the real toy next to the page while you color. Matching the colors to the toy itself is a nice change from looking at the colored example.
Ideas for toy coloring pages at home
Once you have made one toy page, more ideas follow:
- A toy parade. Make a page for each favorite toy and hang them in a row.
- Before it goes to the attic. Make a page of a toy that is about to be outgrown or passed on, and keep the colored page as a keepsake.
- The pet’s favorite toy. The squeaky ball and the chewed rope deserve a page too. See how to turn your pet’s photo into a coloring page.
- A coloring session with the toy as guest. Seat the toy at the table and color its page together. Our post on coloring together as a family routine has more ideas for regular family coloring time.
A note on logos and characters
Many toys show a brand logo or a cartoon character. A coloring page you make of your own toy is for your family to color at home. Pages made with Outlineify are for personal, non-commercial use, such as printing and coloring at home and sharing with family, as our Terms of Use explain. Please do not sell pages or use them for other purposes.
Your photo is used only to make your page and is deleted from our servers as soon as the page is done. The finished page stays in My Drawings, ready to print again when the favorite toy needs a fresh page.
Toy coloring page questions
Which toys make the clearest coloring pages?
Toys with clear outlines and a few big parts, such as toy cars, teddy bears, wooden blocks and dolls, give the cleanest pages. Toys with many tiny parts, tangled hair or busy patterns turn into pages with many small areas.
How do I photograph a toy for a coloring page?
Put the toy on a plain floor or table in daylight, get down to the toy's height and fill most of the frame with it. Remove other toys from the background so the page shows only the favorite one.
Can I make a coloring page of a toy with a cartoon character on it?
You can make a page for your family to color at home. Pages made with Outlineify are for personal, non-commercial use, so do not sell them or use them for anything other than coloring and sharing with family.
Should I choose 0–2 or 2+ for a toy coloring page?
Choose 0–2 for big, simple shapes with thick lines and only a few colors. Choose 2+ to keep more of the toy's details, such as wheels, buttons and stitching. You can make both from the same photo.
Can I combine several toys on one coloring page?
You can, but one toy per photo gives the clearest page. If you want a group, place the toys close together on a plain background and crop tightly around them.